CrewGo App - User Guide for Clients
1.0 Welcome to CrewGo
Manage your projects and team anytime/anywhere with CrewGo. User friendly, simple and convenient specifically made to handle your business needs. Create bookings, get a quote, edit shift times, check who’s working where.
1.1 iOS download
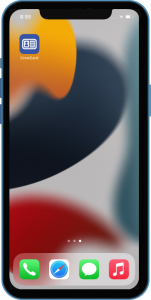
Launch the App Store
Search the app CrewGo by Personnel Manager
Press download
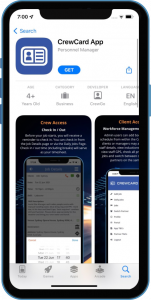
Click the app
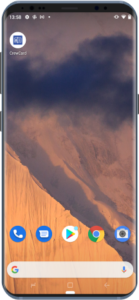
1.2 Android Download
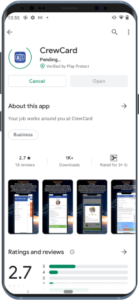
Launch the Google Play Store.
Tap the Search icon on the bottom right of your screen.
Type CrewGo in the search bar.
Tap Install once you’ve found the app.
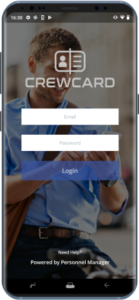
2.0 Login
After downloading the app, launch the CrewGo app and you will be taken to the login page. Admin of the system will give you access to the app and provide you with a password.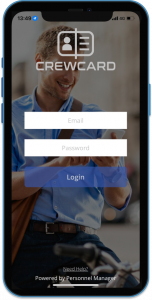
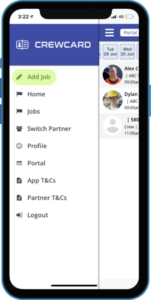
3.0 Add Jobs
If you have access to add your own jobs this feature will be available.
Tap the Add Job button. This will open the Client Portal page where you can book a new job.
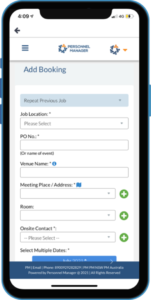
Booking Person: Select the booking person from the dropdown menu.
Job Location: Select the job location from the dropdown menu.
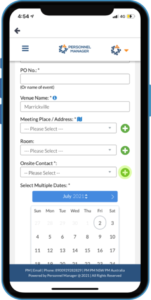
PO No: Enter the PO Number on this field.
Venue Name: Enter the first three letters of the venue name. Suggestions will appear and tap the venue name.
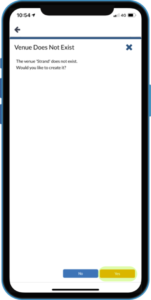
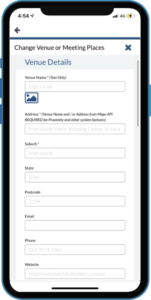
NOTE: If the Venue you entered on the field is non-existent, the app will ask you if you want to add that venue. Please follow the instruction on how to Add Venue below. The app will ask you if you want to add that venue. Click Yes to proceed.
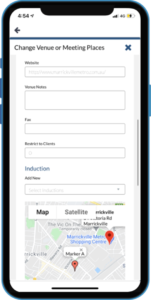
The Venue Details page will open where you can enter details of the new venue location. Enter the address on the field provided and Google Maps will suggest locations. manually enter the email address.
Note: Mandatory fields are noted with an asterisk.

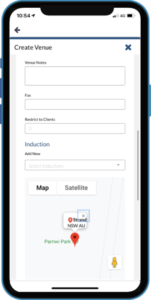
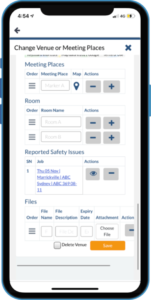
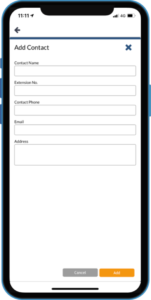
Meeting Place: To add a meeting place, enter the name of the meeting place on the field provided. Click the pin icon. Then a pin will appear on the map.
Room: Enter the name of the room on the field provided.
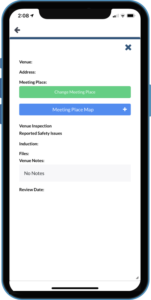
Reported Safety Issue: If there are issues about the job location, it will appear on this section.
Files: If you wish to add files you can do so here. Enter the file name, file description and expiry dates on the provided field.
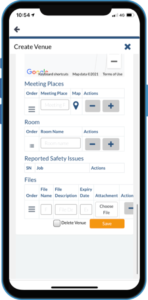
Note: If you wish to add or remove any of the above use the ‘-‘ and ‘+’ buttons.
Once all fields are filled press save.
Meeting Place & Room: Select the meeting place and room from the dropdown menu. If you want to add another meeting place or room, click the + icon and follow instructions under Adding Venue.
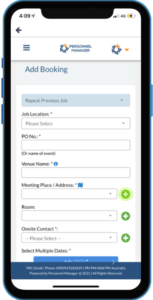
Onsite Contact: Select an onsite contact from the dropdown menu. Click the plus icon if you want to add another onsite contact.
This will take you to a new page.
Fill out the fields and press save. It will return you back to the booking page.
Next, select the date of the job. Tap on each of the dates where you want your job to be scheduled. Click Next.
No of Crew: Type the number of crew you require
Time On: Stat time of job
Time Off: End time of job
Activity: The Required activity performed on shift
Ability: Ability you wish staff to have on shift
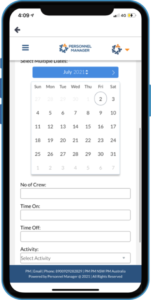

Press Next.
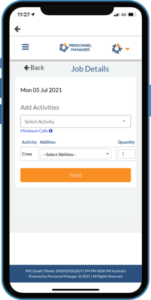
Job Details: You add activities number of staff
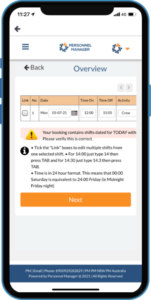
Over View: Will show you the job’s information and allow you to edit before saving.
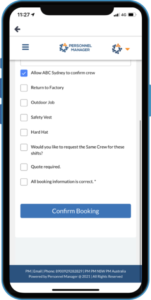
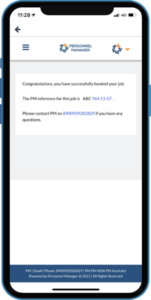
Final Information: You can leave notes for the job and tick box any information for crew. Then press confirm booking.
4.0 Home
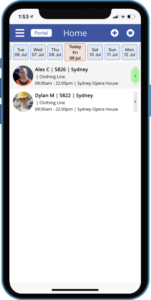
Home displays jobs by the day. Scroll left and right to find the date you wish to view. Click the arrow on the job you wish to view, this will display more job details.
On the top right there is a menu that will display page links, click the three horizontal lines. 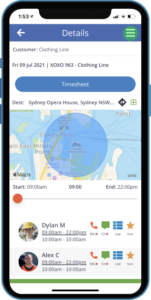
When pressed the following functions will be presented.
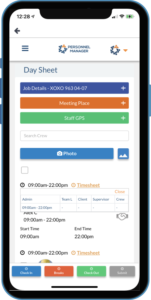
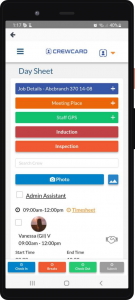
Day sheet:
The Day Sheet allows you to enter times directly into the system and to report the performance of a crew. You can also process safety inspection and induction.
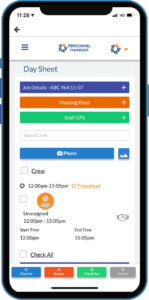
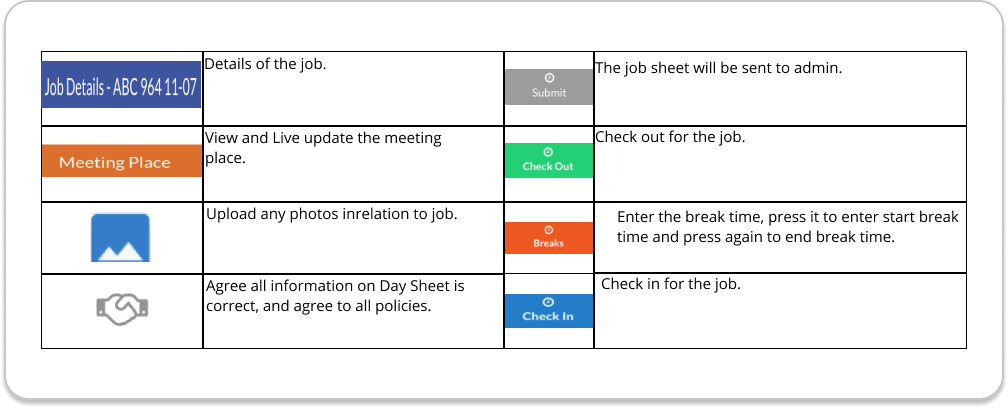
Job Details: Similar with the crew member, you also have the Job Details section on the Day Sheet. The only difference is that you have the Supervisor section. As Team Leader, you will be able to enter the details of the Supervisor on this field if it’s available.
Staff GPS: You can drag the slider to show the pin of
the crew on each given time. You can also click Refresh Map to display the most current location of the crew.
Check in/out and breaks: The Day Sheet will refresh and the selected Check In time will be reflected in green font with “CL” mark for Team Leader.
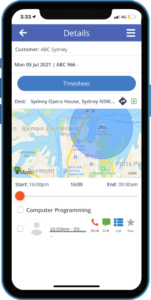
Timesheet: Click the Timesheet link on the Day She
et to view the time entered by Crew, Supervisor, Team Leaders, Admin and Duty Managers. See below for an example:
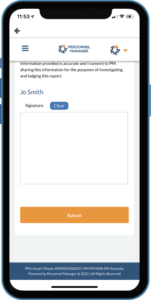
Sign Off: Affix your signature on this field if you are satisfied with the job rendered by the crew.
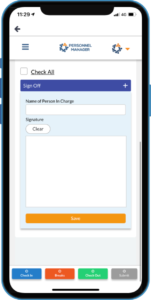
Day Sheet Submission Click the Submit button to submit the Day Sheet. A checklist of requirements will appear for your review before submitting the Day Sheet. Once you are certain that everything is in order, click Yes. Click OK. Day Sheet is now submitted and lock icon will appear.
Safety Forms
- Inspection
- Induction
- Incident Report
- Safety Issue
If you tap on these options, it will open the safety forms for you fill out.
Inspection:
This is the Venue Inspection Form. When you tap on this option, it will open the Venue Inspection Form where you will be able to enter information about the venue.
Workplace inspections help prevent incidents, injuries and illnesses. Through a critical examination of the workplace, inspections help to identify and record hazards for corrective action.
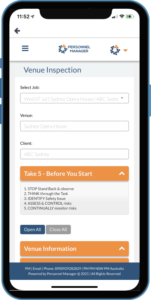
The content of the Venue Inspection Form may vary from one client to another. The contents of the form are set via the Admin Portal.
You can click on the arrow buttons to display the fields where you can enter data and information.
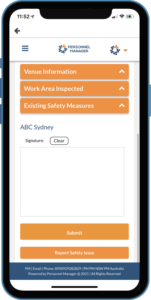
Once you have completed filling out the forms, affix your signature and click Submit.
After you have submitted it, the form will ask you if you want to submit a Report Safety Issue. Click Yes if you want to report a safety issue, otherwise click No.
Induction:
A safety induction is conducted to welcome new employees to the company and prepare them for their new role. It ensures workers are fully informed about the organisation and are aware of their work and responsibilities. It serves as a starting point for an organisation to introduce a culture of safety in the workplace.
This is the Safety Induction Form for Team Leader. For other crews, it will show as General Activity Induction.
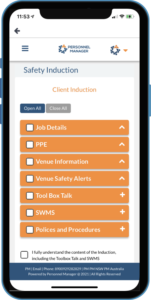
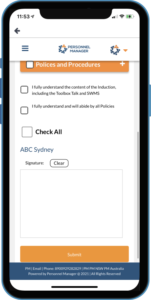
Note: The contents of the Safety Induction Form may vary depending on how it was configured from the Admin Portal.
Use the arrows to expand the information:
Job Details: The current job
Venue Information: Staff entry, security location, first aid location, emergency meeting point, restrooms location
Venue Safety Alerts: If there are reported safety issues on this venue, it will show up here.
Tool Box Talk: Click on the plus icon to display the content for Tool Box discussion.
If a selected Activity is mapped to SWMS/PPE and Policies, it will appear on the Safety Induction. Click on PPE to display the required PPE for the job.
Incident Report:
An incident report is a tool that documents any injuries and accidents, near misses, property and equipment damage, health and safety issues, security breaches and workplace misconduct.
An incident report can be used in the investigation and analysis of an event. It includes the root cause and corrective actions to eliminate the risks involved and prevent similar future occurrences. Incident reports can also be used as safety documents that indicate potential risks and uncontrolled hazards found in the workplace.
When you tap Incident Report from the Job Options, it will open a form that you can fill out with information.
Similar with the other forms, you need to select the job from the dropdown menu that is applicable to the incident. The Client and Venue will be automatically entered.
Click the “i” icon to view the details of the insurance company.
You can now start filling out the Incident Report Form:
- Time of Incident
- Incident Location
- Description of Incident
- Staff Name
- Mobile Number
- Witness Name
- Witness Mobile Number
For the question, “Have you ever received medical care for this incident?”, you can select Yes or No.
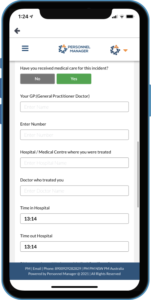
If you received a Medical Certificate, you need to upload it to the system. Select Yes or No to answer if you have lodge a Workers Compensation claim.
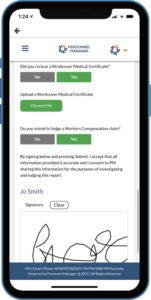
Affix your signature and click Submit once completed.
Safety Issue:
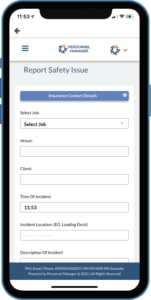
This Report Safety Issue Form will identify health and safety problems in the workplace.
Fill out the safety form, select the job from the dropdown menu. This will automatically fill out the Venue and Client information.
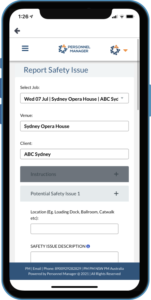
Click the plus sign if will show you instructions on how to use the Risk Matrix.
Fill out the Potential Issue by clicking the plus icon:
Location: Identify the location of the safety issue and enter on this field
Safety Issue Description: Describe the safety issue and provide more details as needed
What harm could be the safety issue cause: Identify what harm it can cause to employees, clients and other stakeholders
What crew at risk: Identify which crew are at risk
Likelihood: Select from the dropdown menu
- Certain to Occur
expected to occur in all circumstances (every time) - Very Likely
Will probably occur in most circumstances (1 in 5 times) - Possible
Might occur occasionally (1 in 50 times) - Unlikely
Could happen at some time (1 in 100 times) - Rare
May happen only exceptional circumstances
Consequence: Select from the dropdown menu
- Catastrophic
Many injuries fatalities and widespread medical attention required - Severe
Extensive injuries hospitalisation possible fatalities, long term disabilities - Major
Medical treatment required but no fatalities - Moderate
Minor injuries no fatalities first aid treatment required - Minor
No injuries or fatalities little or no personal support required
Risk Rating: Depending on your choice on the Likelihood and Consequence, the Risk Rating is calculated automatically.
- Extreme
- High
- Medium
- Low
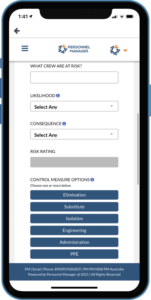
Now select the Control Measure that can be used to mitigate the Safety Issue.
- Elimination — Physically remove the hazard
- Substitution — Replace the hazard Eg, swap faulty equipment for safe equipment
- Isolation — separate the hazard from the people at risk by isolating it Eg. barricade the hazardous area
- Engineering — Isolate people from the hazard Eg. Cordon off the area where the hazard is found
- Administration — Change the way people work Eg. Use a forklift to lift a heavy load or use a ramp to a loading dock or move a truck closer to the load in
- PPE — Protect the worker with Personal Protective Equipment Eg. Steel cap safety shoes/boots, hard hats, Hi Vis safety vests, gloves
Based on the selected ControlMeasure, select the New Likelihood and New Consequence. This will calculate a new Risk Rating.
Sign the form and press Submit.
Repeat Job
If you would to repeat the job, click repeat job, confirm the job sheet

Write a description and select a date.
Click submit.
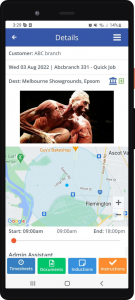
5.0 Jobs
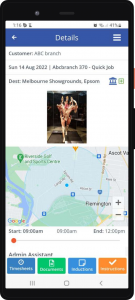
The Job page will display job cards for your current job bookings and upcoming job bookings. The job card will have the following details:
Job Number — Shift Number
Location of the job
Activity for the Job
Client Name
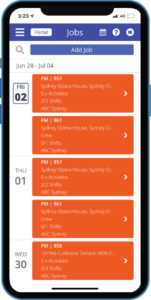
Click the arrow to view Job Details:
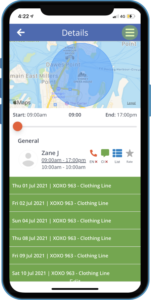
GPS MAP: The GPS maps will display a pin representing the crew members. The pin will determine if the crew is within the vicinity of the job location. You can also slide the timer to see the whereabouts of the crew on a given time.
App Communication
On the Job Details page, you can call or send a message to the staff.
Simply tap on the phone icon of the staff to initiate the call.
Next to each crew there is a phone icon the En Route (EN) key — a notification will be sent to the crew if they are en route to the job location. If they have confirmed to be en route, a check mark will appear next to “EN”.
The message icon allows you to message the crew through the app. Under is the Check In (CI) key — once crew has checked in to the job, there will be a check symbol next to “CI”
Note: you can also send a photo by tapping on the photo icon.
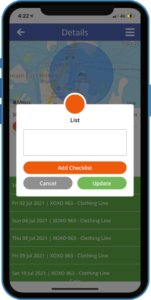
List: Add a check list for crew to make sure they complete all task on the job and bring all the required equipment.
Star Rating
You can rate the star based on his performance. Tap the star icon to open the rating pop-up. Select the number of stars for the rating of the crew.
You may also leave your feedback and tap the boxes below if they have complete PPE, Uniform, shown Professionalism and workmanship during the entire shift.

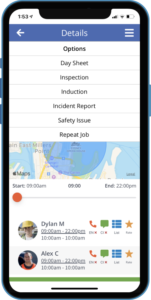
Job Options
Tap the three horizontal lines on the upper right corner of the screen to display the Job Options.
The Job Options include the following:
Day Sheet
Inspection
Induction
Incident Report
Safety Issue
Actions

Day sheet:
The Day Sheet allows you to enter times directly into the system and to report the performance of a crew. You can also process safety inspection and induction.
Job Details: Similar with the crew member, you also have the Job Details section on the Day Sheet. The only difference is that you have the Supervisor section. As Team Leader, you will be able to enter the details of the Supervisor on this field if it’s available.
Staff GPS: You can drag the slider to show the pin of
the crew on each given time. You can also click Refresh Map to display the most current location of the crew.
Check in/out and breaks: The Day Sheet will refresh and the selected Check In time will be reflected in green font with “CL” mark for Team Leader.
Timesheet: Click the Timesheet link on the Day She
et to view the time entered by Crew, Supervisor, Team Leaders, Admin and Duty Managers. See below for an example:
Sign Off: Affix your signature on this field if you are satisfied with the job rendered by the crew.
Day Sheet Submission Click the Submit button to submit the Day Sheet. A checklist of requirements will appear for your review before submitting the Day Sheet. Once you are certain that everything is in order, click Yes. Click OK. Day Sheet is now submitted and lock icon will appear.
Safety Forms
- Inspection
- Induction
- Incident Report
- Safety Issue
If you tap on these options, it will open the safety forms for you fill out.
Inspection:
This is the Venue Inspection Form. When you tap on this option, it will open the Venue Inspection Form where you will be able to enter information about the venue.
Workplace inspections help prevent incidents, injuries and illnesses. Through a critical examination of the workplace, inspections help to identify and record hazards for corrective action.
The content of the Venue Inspection Form may vary from one client to another. The contents of the form are set via the Admin Portal.
You can click on the arrow buttons to display the fields where you can enter data and information.
Once you have completed filling out the forms, affix your signature and click Submit.
After you have submitted it, the form will ask you if you want to submit a Report Safety Issue. Click Yes if you want to report a safety issue, otherwise click No.
Induction:
A safety induction is conducted to welcome new employees to the company and prepare them for their new role. It ensures workers are fully informed about the organisation and are aware of their work and responsibilities. It serves as a starting point for an organisation to introduce a culture of safety in the workplace.
This is the Safety Induction Form for Team Leader. For other crews, it will show as General Activity Induction.
Note: The contents of the Safety Induction Form may vary depending on how it was configured from the Admin Portal.
Use the arrows to expand the information:
Job Details: The current job
Venue Information: Staff entry, security location, first aid location, emergency meeting point, restrooms location
Venue Safety Alerts: If there are reported safety issues on this venue, it will show up here.
Tool Box Talk: Click on the plus icon to display the content for Tool Box discussion.
If a selected Activity is mapped to SWMS/PPE and Policies, it will appear on the Safety Induction. Click on PPE to display the required PPE for the job.
Incident Report:
An incident report is a tool that documents any injuries and accidents, near misses, property and equipment damage, health and safety issues, security breaches and workplace misconduct.
An incident report can be used in the investigation and analysis of an event. It includes the root cause and corrective actions to eliminate the risks involved and prevent similar future occurrences. Incident reports can also be used as safety documents that indicate potential risks and uncontrolled hazards found in the workplace.
When you tap Incident Report from the Job Options, it will open a form that you can fill out with information.
Similar with the other forms, you need to select the job from the dropdown menu that is applicable to the incident. The Client and Venue will be automatically entered.
Click the “i” icon to view the details of the insurance company.
You can now start filling out the Incident Report Form:
- Time of Incident
- Incident Location
- Description of Incident
- Staff Name
- Mobile Number
- Witness Name
- Witness Mobile Number
For the question, “Have you ever received medical care for this incident?”, you can select Yes or No.
If you received a Medical Certificate, you need to upload it to the system. Select Yes or No to answer if you have lodge a Workers Compensation claim.
Affix your signature and click Submit once completed.
Safety Issue:
This Report Safety Issue Form will identify health and safety problems in the workplace.
Fill out the safety form, select the job from the dropdown menu. This will automatically fill out the Venue and Client information.
Click the plus sign if will show you instructions on how to use the Risk Matrix.
Fill out the Potential Issue by clicking the plus icon:
Location: Identify the location of the safety issue and enter on this field
Safety Issue Description: Describe the safety issue and provide more details as needed
What harm could be the safety issue cause: Identify what harm it can cause to employees, clients and other stakeholders
What crew at risk: Identify which crew are at risk
Likelihood: Select from the dropdown menu
- Certain to Occur
expected to occur in all circumstances (every time) - Very Likely
Will probably occur in most circumstances (1 in 5 times) - Possible
Might occur occasionally (1 in 50 times) - Unlikely
Could happen at some time (1 in 100 times) - Rare
May happen only exceptional circumstances
Consequence: Select from the dropdown menu
- Catastrophic
Many injuries fatalities and widespread medical attention required - Severe
Extensive injuries hospitalisation possible fatalities, long term disabilities - Major
Medical treatment required but no fatalities - Moderate
Minor injuries no fatalities first aid treatment required - Minor
No injuries or fatalities little or no personal support required
Risk Rating: Depending on your choice on the Likelihood and Consequence, the Risk Rating is calculated automatically.
- Extreme
- High
- Medium
- Low
Now select the Control Measure that can be used to mitigate the Safety Issue.
- Elimination — Physically remove the hazard
- Substitution — Replace the hazard Eg, swap faulty equipment for safe equipment
- Isolation — separate the hazard from the people at risk by isolating it Eg. barricade the hazardous area
- Engineering — Isolate people from the hazard Eg. Cordon off the area where the hazard is found
- Administration — Change the way people work Eg. Use a forklift to lift a heavy load or use a ramp to a loading dock or move a truck closer to the load in
- PPE — Protect the worker with Personal Protective Equipment Eg. Steel cap safety shoes/boots, hard hats, Hi Vis safety vests, gloves
Based on the selected ControlMeasure, select the New Likelihood and New Consequence. This will calculate a new Risk Rating.
Sign the form and press Submit.
Repeat Job
If you would to repeat the job, click repeat job, confirm the job sheet
Write a description and select a date.
Click submit.
5.1 Timesheet
When the timesheet is tapped this will direct you to the day sheet page.
The Day Sheet allows you to enter times directly into the system and to report the performance of a crew. You can also process safety inspection and induction.
For more details about the Day Sheet, please refer to CrewGo Client App Access 5.0 Jobs >> Day Sheet
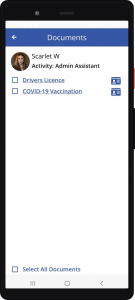
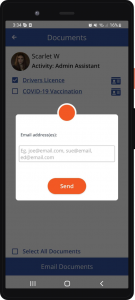
5.2 Documents
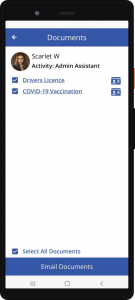
The Documents page displays all the qualifications of the Crew that are associated with the activity of the certain shift.
In the Job details page, tap the Documents button.
To view the Document, simply tap the document name or the Crew Pass icon.
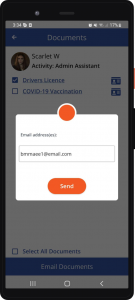
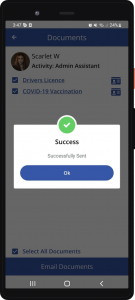
If you wish to send the documents to your Client, select the document you wish to send and Tap Email Documents.
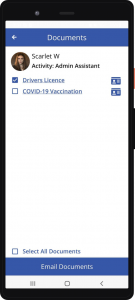
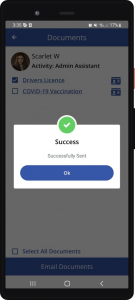
A pop up will appear, enter the Email Address and tap the Send button.
To Send all the documents, Tap the checkbox “ Select All Documents” and tap the Email Documents.
A pop up will appear, enter the Email Address and tap the Send button.

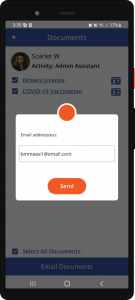
Note that you can send the documents to multiple users by adding a comma after the email address has been entered.
5.3 Inductions
Induction is important to a job as it educates the crew about important information about a job that they may not be aware of.
Tap the induction button in the Job Details page.

Once redirected to the Induction Page wherein you may do the following:
- Expiry Date, edit the expiry date
- Open Upload File

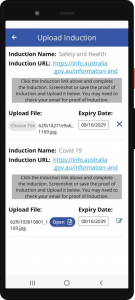
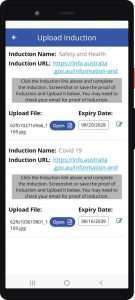
Furthermore, If you need to view the uploaded inductions, you may tap on the Documents button in the Job details page or tap the Crew Pass icon in the Home page.
5.4 Instructions
Some jobs need additional instruction to be able to finish the job properly. Instructions are not only limited to text but may also include photos, images, or files. To add an instruction please check the instructions below:
On the homepage, please tap on the right arrow on the job.

Once on the Details page, please select Instructions at the bottom of the screen.
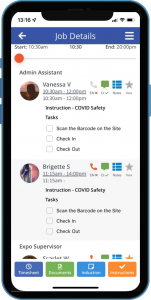
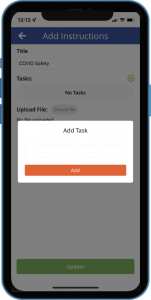
On the Instructions Page, you may do the following tasks:
- Input the Title into the title textbox.
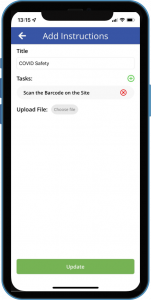
- Add tasks by selecting the + icon, input Task Name, and once done tap Add.
- Remove tasks by selecting the X icon.
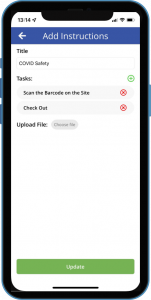
- To upload file(s), tap Choose File and select the source where the file is located on your device.
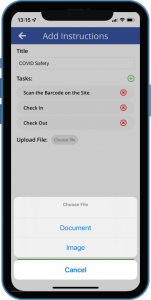
- Tap on Update to save the changes.
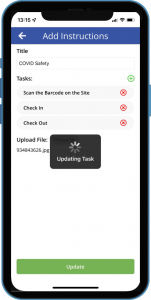
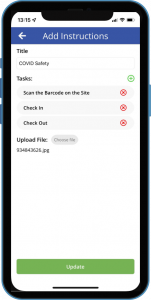
To check if the instructions were updated, you may check on the Details page to see the update.
6.0 Switch Partner
If you have multiple businesses under CrewGo you can jump between portals. Click Switch Partner. Then select the portal you wish to go to.

Note: Any actions performed on each portal will not affect the others.
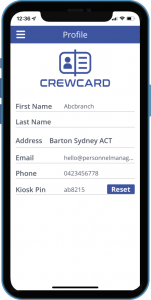
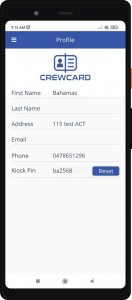
7.0 Profile
On the Main Menu please tap Profile.

Once on your Profile Page, you may access the following Information:
- First and Last Name
- Address
- Phone
- Kiosk Pin

Furthermore, next to your Kiosk Pin you may reset the current combination to generate a new pin which may be used on the Kiosk feature of the app.
8.0 Portal
Click to portal button on the menu.
This will take you to the portal. It will direct you to the calendar.
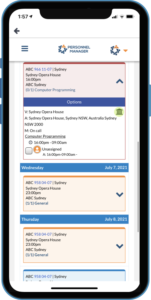
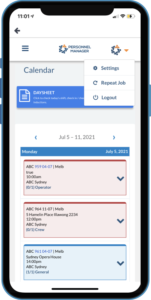
Calendar:
The Calendar is a useful tool in the CrewGo to overview jobs Bookings change colour based on who locked the shift.
Crew Locked — Blue
Client Locked — Dark Red
Other lock including Admin Lock — Orange
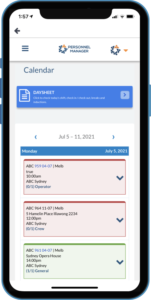
Use the arrow to expand the job to view more information (please see this guide to learn the use of day shifts)
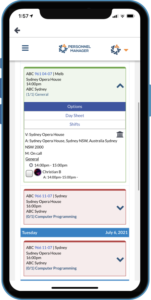
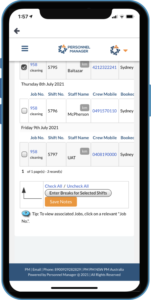
Shifts: Over view the shifts for the job, you can enter break times and notes for one of more shift by using the tick box.
Venue: Press the house button
You can change the meeting place or view the meeting place.
Click the top right corner of the page which will open a drop down menu. Click settings.
You will be able to edit your profile here.
Note: With any changes make sure you press the save button.
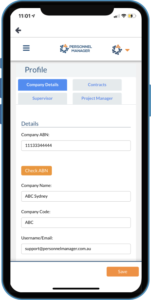
You can edit the following details on your profile:
Company ABN Mobile no.
Company Code Website
Username/Email Address
First and Last name Password
Phone Billing Address
Primary Contact no. Add and Remove Booking Person
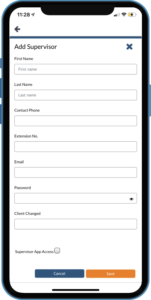
Supervisor: View and add supervisors. Press add supervisor.
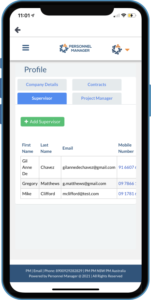
Fill our the fields and press save. This will save in the system for future use.
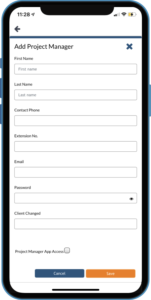
 Project Manager: View and add project managers. Press add project manager.
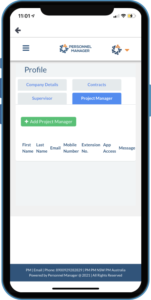
Fill our the fields and press save. This will save in the system for future use.
9.0 iOS Kiosk
For instances where a crew does not have access to their phone during their shift, CrewGo has developed a feature called Kiosk. The kiosk would enable clients or supervisors to Check-In/Out, and Start/End break on behalf of the crew. To use this feature please follow the instructions below:
On the Main Menu please tap Profile.

You would be redirected to your Profile and would be able to view your Kiosk Pin, you may tap Reset to generate a new Pin. Once the new pin is generated please take note of the pin as it is needed in the latter part of the process.
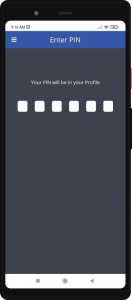
Please tap the Main Menu at the top-left corner of the page and tap Kiosk.
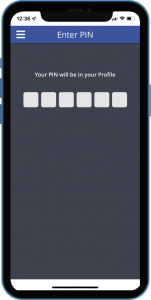
You will be redirected to a page where the Kiosk Pin would be needed, please input and enter.
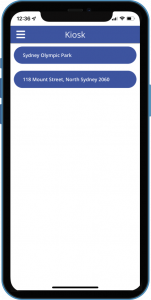
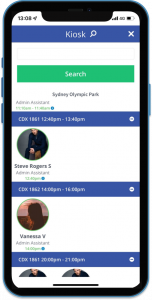
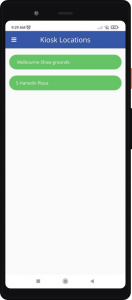
A page where a list of locations where a crew(s) is assigned will be provided. Please select the location from the list.
A page showing a list of the crew will be provided. Please select a crew from the list by tapping their picture and selecting Check In.
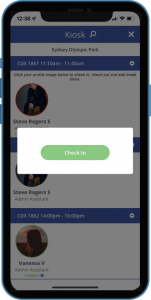
A window would appear, asking for the kiosk pin of the crew. Once done a confirmation window would appear with the status of the check-in. Tap Ok to confirm. (For scenarios where the client only has 1 tablet/smartphone at the location, the Crew is required to check in by themselves else the client or a supervisor would have to check in on behalf of the crew).

To add, please see the list below on what each border color on the crew’s profile means.
- No Color — Crew haven’t checked-in yet.
- Green — Crew is currently checked-in.
- Red — Crew has checked-out.
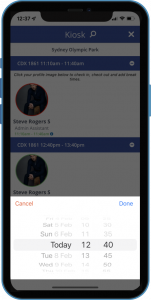
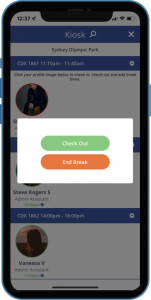
For adding a break please select the crew’s profile and select Add Break (For scenarios where a crew does not have a break you may select check out.)

After selecting Add Break, a window would appear where you may select Date, Hour, and Minute according to the break time. Once done please tap Done.
A window would appear, asking for the kiosk pin of the crew. Once done a confirmation window would appear with the status of the break. Tap Ok to confirm.
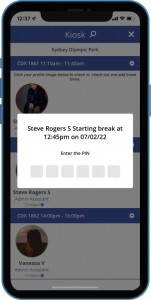

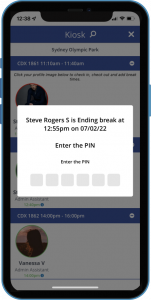
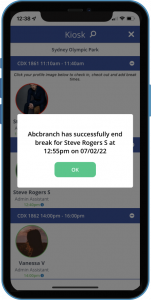
For ending a break please select the crew’s profile and select End Break.

After selecting End Break, a window would appear where you may select Date, Hour, and Minute according to the break time. Once done please tap Done.

A window would appear, asking for the kiosk pin of the crew. Once done a confirmation window would appear with the status of the break. Tap Ok to confirm.
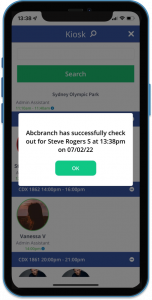
For checking out please select the crew’s profile and select Check Out.
After selecting Check Out, a window would appear where you may select Date, Hour, and Minute according to the checkout time. Once done please tap Done.

A window would appear, asking for the kiosk pin of the crew. Once done a confirmation window would appear with the status of the checkout. Tap Ok to confirm.
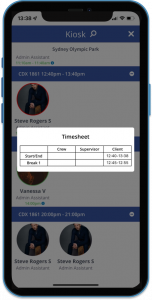
Once an employee has been checked out a red border would be placed around their picture. You may also tap on the time below the picture to view the timesheet it can provide information regarding the following:
-
- Check-In Time
- Start Break Time
- End Break Time
- Check-Out Time
- Crew, Supervisor, or Client (on who have attended the activity)
There is also a Search function represented by the search icon beside Kiosk at the top of the page. The Search function may help you filter and manage multiple crew’s.
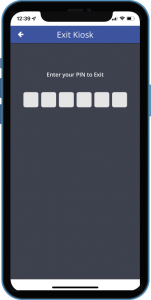
To exit the Kiosk page please select the X icon at the top-right part of the page. For clients or supervisors you would need to enter your Kiosk Pin to exit and will be redirected to the homepage.
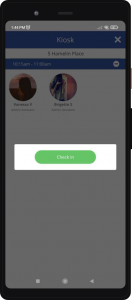
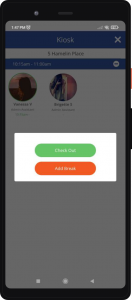
10.0 Android Kiosk
For instances where a crew does not have access to their phone during their shift, CrewGo has developed a feature called Kiosk. The kiosk would enable clients or supervisors to Check-In/Out, and Start/End break on behalf of the crew. To use this feature please follow the instructions below:
On the Main Menu please tap Profile.
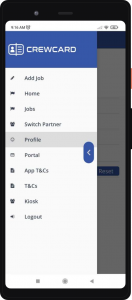
You would be redirected to your Profile and would be able to view your Kiosk Pin, you may tap Reset to generate a new Pin. Once the new pin is generated please take note of the pin as it is needed in the latter parts of the process.
Please tap the Main Menu at the top-left corner of the page and tap Kiosk.
You will be redirected to a page where the Kiosk Pin would be needed, please input and enter.
A page where a list of locations where a crew(s) is assigned will be provided. Please select the location from the list.
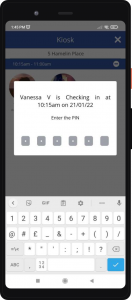
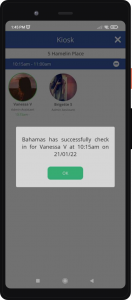
A page showing a list of the crew will be provided. Please select a crew from the list by tapping their picture and selecting Check In.
A window would appear, asking for the kiosk pin of the crew. Once done a confirmation window would appear with the status of the check-in. Tap Ok to confirm. (For scenarios where the client only has 1 tablet/smartphone at the location, the Crew is required to check in by themselves else the client or a supervisor would have to check in on behalf of the crew).
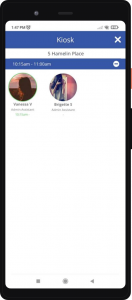
To add, please see the list below on what each border color on the crew’s profile means.
- No Color — Crew haven’t checked-in yet.
- Green — Crew is currently checked-in.
- Red — Crew has checked-out.
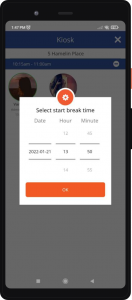
For adding a break please select the crew’s profile and select Add Break (For scenarios where a crew does not have a break you may select check out.)
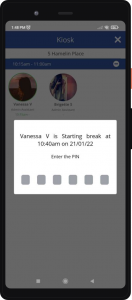
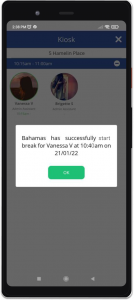
After selecting Add Break, a window would appear where you may select Date, Hour, and Minute according to the break time. Once done please tap Ok.
A window would appear, asking for the kiosk pin of the crew. Once done a confirmation window would appear with the status of the break. Tap Ok to confirm.
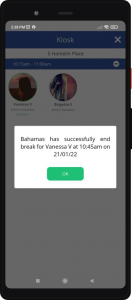
For ending a break please select the crew’s profile and select End Break.

After selecting End Break, a window would appear where you may select Date, Hour, and Minute according to the break time. Once done please tap Ok.
A window would appear, asking for the kiosk pin of the crew. Once done a confirmation window would appear with the status of the break. Tap Ok to confirm.
![]()
For checking out please select the crew’s profile and select Check Out.
After selecting Check Out, a window would appear where you may select Date, Hour, and Minute according to the checkout time. Once done please tap Ok.
![]()
![]()
Once an employee has been checked out a red border would be placed around their picture. You may also tap on the time below the picture to view the timesheet it can provide information regarding the following:
- Check-In Time
- Start Break Time
- End Break Time
- Check-Out Time
- Crew, Supervisor, or Client (on who have attended the activity)
![]()
There is also a Search function represented by the search icon beside Kiosk at the top of the page. The Search function may help you filter and manage multiple crew’s.
![]()
To exit the Kiosk page please select the X icon at the top-right part of the page. For clients or supervisors, you would need to enter your Kiosk Pin to exit and will be redirected to the homepage.
![]()